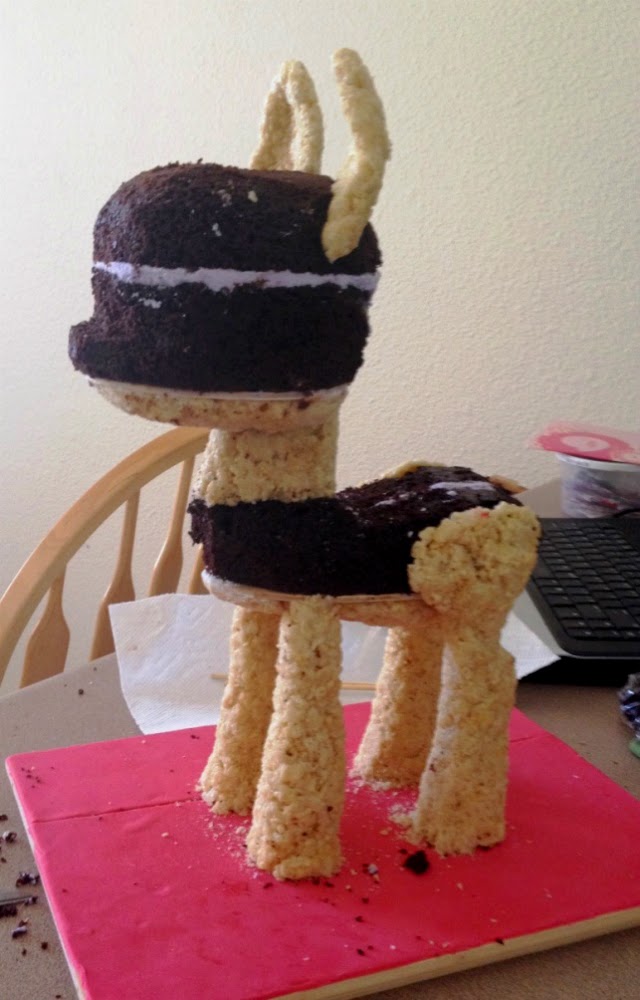
This is more like a post that happens to have progress shots, because I'm sure you're pretty curious.
I've been wanting to make a My Little Pony cake for my oldest daughter's birthday since two birthdays ago, but 1) I didn't have the time to, and 2) I didn't have the experience. So this year I finally did it.
Obviously, to make a standing, sculpted cake, you need something to support it. Originally I was going to use PVC piping, but even the smallest widths were too big. I didn't need to make a big cake because it was just me and my daughter eating it. I used wooden dowels instead.
I used a dense-ish double chocolate cake (which tasted amazing) for the body and head, since they're the biggest parts. I then used rice crispy treats for the legs, neck, and ears, and I also used them for the bottom of the body and head.
The buttercream is purple just because that's what I had leftover from making her entire class cupcakes. I only made a double batch, but it was still more than enough. (48 cupcakes and a pony. Oy!)
To even everything out, the bumps and whatnot, I covered the entire thing in a thin layer of buttercream. I personally don't like a lot of frosting, otherwise I would've added more.
I used a 50/50 mix of purple modeling chocolate and white fondant to achieve the color that I wanted. The detail - her cutie mark, eyes, and hair - were cut out of varying ratios of fondant and modeling chocolate.
I hope you enjoyed seeing my few progress shots. I also hope it inspires you in case you ever need to do something like this. Feel free to post any questions. Obviously I left a lot to the imagination, not because I don't want to reveal my "secrets," but because I believe true art comes from instinct and imagination. Plus, if a first-time cake sculptor can figure out how to turn a 2D pony into a 3D cake, I'm sure you wonderfully talented, much more experienced, and good-looking cake artists can figure it out, too. ;)


Wow! You did an amazing job on this cake! Very clean work! Bravo!!
ReplyDeleteThank you very much, Jenniffer!
DeleteAmazing cake! Your daughter must've been so so so happy!
ReplyDeleteThank you! She was very excited to dig into it. :)
DeleteAmazing!!!!! How did you support the dowels in the wooden base in order to hold the weight of the cake? You just opened a hole and stuck it in???
ReplyDeleteMany thanks
Thank you!
DeleteI simply drilled holes that were the same width as the dowels. The tight fit, plus a dab of wood glue, was enough to hold the entire cake up. :)
Wooo hoo, amazing ! Love it!
ReplyDeleteThanks so much!
DeleteI know this is two years late but did you have issues with your rice krispies falling down? I'm attempting this and for some reason my rice krispies won't stick...any advice??
ReplyDeleteHI Jordan! I attached the rice crispies with candy melts (I believe). You could also use buttercream if it's thick enough, or royal icing if you have the patience. I hope all goes well!
DeleteSo tbrilled to find your starting point with that structure! My grabs daughter challenges my talents every year. This year she wants a 3D pony. THIS HELPED SO MUCH FOR ME TO FEEL I CAN DO THIS...Cause she wants " Lillie lips (off shopkins) to be riding rarity!
ReplyDeleteSo THANK YOU